"We interrupt our challenge schedule to try something new for the month of August....a headpin challenge. But not just any kind of run of the mill headpin.
We're talking fancy schmancy art headpins.
What is an art headpin?
Well...it's a headpin that is handcrafted by an artisan, has been manipulated in a manner that is more than just a ball end, and has the potential to be the centerpiece of a creation rather than just playing a supporting roll." (the above statements are courtesy of
Well I checked my stash and rats, I don't own any art headpins.
How did that happen? I love art headpins.
So I'll just have to make my own.
Take some wire -20 gauge; cut two pieces 6 inches long
Now I could just make swirly coiled headpins but that's so meh.
Lets try soldering.
So I make some bends on one end of each wire to create triangles.
Make a bend in the middle of one side to make the long pin part of the headpin.
Next-add some solder to fill in the gaps .
Sounds simple -right?
NOT!!!!
Who knew that solder doesn't go where one wants it to just by wishing.
You actually have to control the solder.
My soldering skills are rusty - well truthfully they are non-existent,
so this was truly a challenge for me.
but I persevered and FINALLY got the solder to stay where I wanted it to stay.
But were they what I wanted to create? Perhaps, perhaps not, but it took so many attempts to get to this point that I decided they are just fine. So MOVE ON Deb.
 |
| they don't look all that great here |
Part of the challenge for me was to also make a finished piece of wearable jewellery.
so the process continued.........
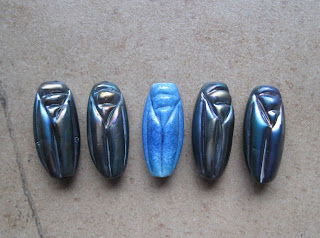
I felt the headpins were a bit raw and unfinished so I added some (Lisa Pavelka) Magic-Glos which requires UV light to cure them, so then I hung them outside to dry and cure for 1/2 hour. Once cured they have a lovely shine plus some thicker dimension to them so they look coated in glass. I was pretty darn pleased with how they turned out.
Next step - choose some lovely glass beads to make earrings.
Why does that process strike such fear in our hearts?
We want perfection folks but perfection takes time and the deadline was looming, so I made my choice, added some tiny lampwork rondel spacers and wired them all together. Add some hand made ear wires and I'm done.
See how pretty they turned out . They are 2-1/2 inches long. I make my ear wires with long tails at the back for better balance and security, they don't fall out of my ears as easily
I felt the headpins were a bit raw and unfinished so I added some (Lisa Pavelka) Magic-Glos which requires UV light to cure them, so then I hung them outside to dry and cure for 1/2 hour. Once cured they have a lovely shine plus some thicker dimension to them so they look coated in glass. I was pretty darn pleased with how they turned out.
Next step - choose some lovely glass beads to make earrings.
Why does that process strike such fear in our hearts?
We want perfection folks but perfection takes time and the deadline was looming, so I made my choice, added some tiny lampwork rondel spacers and wired them all together. Add some hand made ear wires and I'm done.
 |
This process was challenging but exciting and I am much more prepared to do it again with other materials
Thanks so much for stopping by.
To see what the other artists made, click on any of the links below.
To see what the other artists made, click on any of the links below.

What a fun stop on the hop... You made me chuckle a few times and then grin when I saw your earrings. Beautiful job, by the way.
ReplyDeletethanks for stopping by Brooke. boy you are either an early riser or a real night owl . I am glad I brought a chuckle and a grin your way. I was a bit wordy, so bless you for reading all the way through.
Deleteahh a lady like me.. last minute.com!! beautiful head pins and finished ear rings :)
ReplyDeletethanks for stopping by Laney. yes indeed I can be the queen of procrastination. it's when i do my finest work .
DeleteI love your last minute.com , what a great blog name that would be. it's probably already taken.
Fantastic headpins and beautiful earrings, I really enjoyed reading about your creative process.
ReplyDeletethanks for stopping by and leaving a comment. I like to show and tell how I do something but I always forget to take in-progress photos, so I'm left with only the telling part.
DeleteYour headpins and the process you used to make them amazes me. I am unfamiliar with Magic Glos. I will need to check that our. I also never thought to used solder to fill in a large area like you did. Well done!
ReplyDeletethanks for stopping by Kathy, it was a challenge to get the solder to fill in the gaps , it's like mercury-it gets all silvery and shiny and liquid and then bam it hardens and you hope it flowed where you wanted it to. I used an electric soldering wand not a torch so that added to the process and learning curve.
ReplyDeletevery beautiful headpins and pair of earrings.
ReplyDeletethanks Alison. I love the glass like look now that I've added the Magic Glos .
ReplyDeleteI love the texture and colours in your earrings.
ReplyDeleteI'm so glad I finally got to use those art beads as well. I have about 6 of them and they always have seemed to precious to use , but they really went well with my headpins so I bit the bullet and used them.
DeleteI have to laugh about your soldering fun! I also tried to solder some headpins but mine were AWFUL! So I tossed mine.
ReplyDeleteYours look great though! I need to check out the Magic Glos.
Lovely earrings that you made!
thank you . it's amazing how much better the headpins look with a layer of Magic Glos. it's like resin without the two part process and curing time.
DeleteThey turned out beautifully... really enjoyed reading your process!
ReplyDeletethanks. I have a tendency to be wordy so I hope visitors don't mind reading through to the end of my long-winded posts
DeleteGo you! Deadline coming and you rocked a new experiment! Great results. the headpins look cool!
ReplyDeleteIf it wasn't for the last minute I'd not get anything done.lol
DeleteWhat a brilliant idea to add the resin to the soldered headpins. They remind me of mercury glass. And the earrings are beautiful.
ReplyDeleteI haven't heard many people speak of mercury glass. I'm old enough to know what it is. Lol Andy yes those headpins certainly remind me of it.
DeleteLovely, and such a nice combination with the lampwork beads too. Thank you for playing along with us!
ReplyDeleteI love your sense of adventure! And it definitely paid off. Good call adding the resin to the triangles, as it really gave them some extra interest and dimension. Thanks for participating and for reading AJE!
ReplyDeleteLook at you rocking the challenge! For a person with "non-existent" soldering skills they sure came out looking great. The whole look is just perfect
ReplyDeleteMona
I love this post and find it really easy to relate to! You did a great job with your headpins and your earrings are charming!
ReplyDeleteGreat post! Love the earrings...isn't it great when everything comes together???
ReplyDeleteWow! Such a great job. I would have been stumped when I discovered that I didn't have any headpins.
ReplyDeleteGreat to see you take the ptocess from start to finish and challenge yourself - the end result was well worth it.
ReplyDeleteLove the Post and the earrings, also your loss of fear, lol.
ReplyDeleteDeb, great job, I love that you created your own! Thanks for playing along!
ReplyDeleteI am awed by anyone who can make their own components! I like your headpins and the earrings you made with them. I haven't met an artist that thought their creation wasn't perfect, even though everyone else did!
ReplyDelete